If you’ve noticed a “musty” or “vinegar” smell coming from your HVAC system when you start your Tesla Model 3, you aren’t alone. Maintaining your cabin air filters is critical not just for smell, but for protecting the health of your passengers and the efficiency of your climate control system.
In this guide, we provide a professional-grade walkthrough to replacing your Tesla Model 3 air filters, saving you an expensive trip to the Tesla Service Center.
Why Should You Replace Your Tesla Model 3 Air Filters?
Tesla recommends replacing your cabin air filters every two years. However, if you live in a dusty environment or an area with high pollution (like Los Angeles or New York), an annual replacement is preferred.
Benefits of Regular Replacement:
-
Eliminate Odors: Prevents bacteria and mold buildup on the evaporator.
-
Healthier Air: HEPA-grade filters can trap 99.97% of particles, including pollen and PM2.5.
-
HVAC Longevity: Reduces strain on the blower motor by ensuring optimal airflow.
Required Tools & Parts
Before starting, ensure you have the following:
-
Replacement Filters: A set of two (2) high-quality cabin filters (activated carbon or HEPA recommended).
-
T20 Torx Screwdriver: To remove the filter cover screw.
-
Trim Removal Tool: To safely pop off plastic clips without scratching the interior.
-
Evaporator Cleaner (Optional): Such as Kool-It, to deep clean the cooling coils and remove deep-seated smells.
Step-by-Step Guide: How to Replace Your Filters
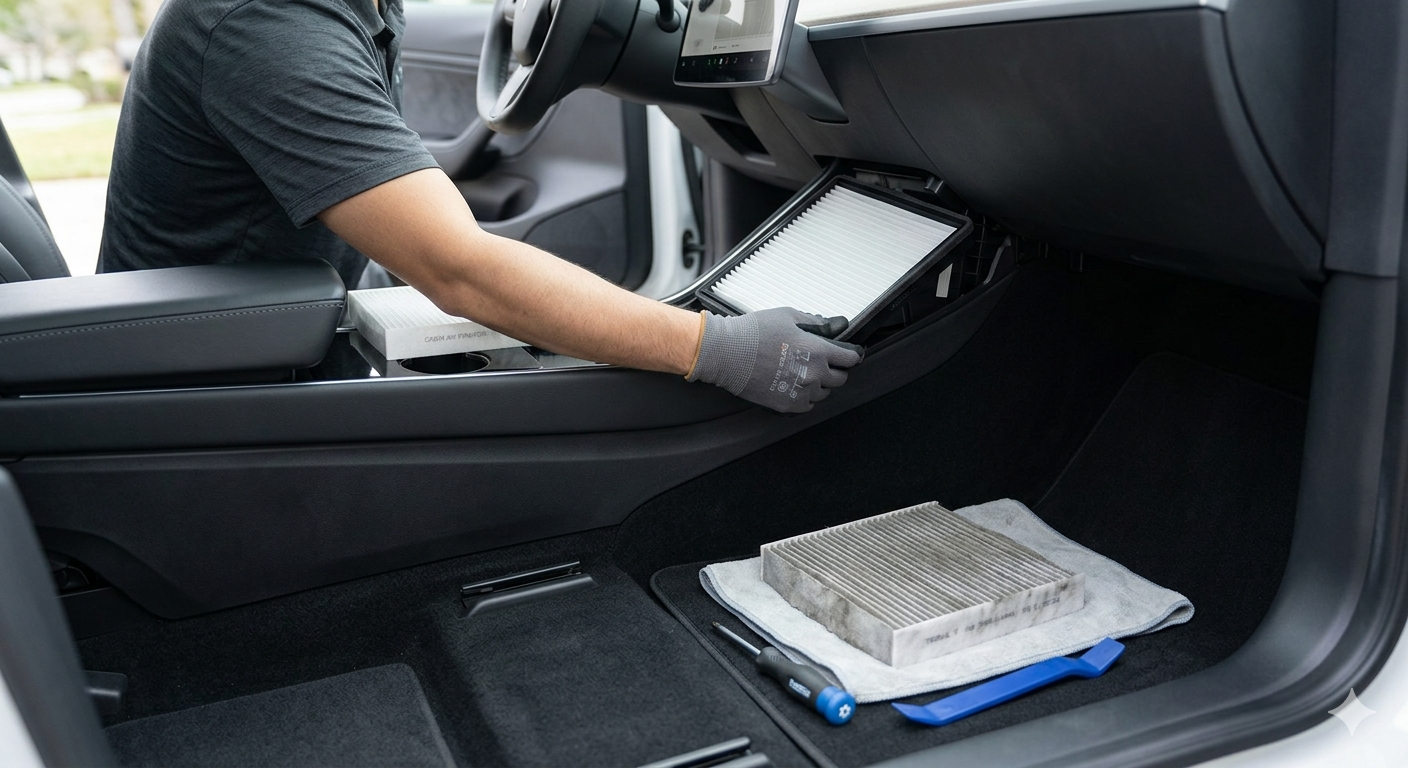
Step 1: Access the Passenger Footwell
Move the front passenger seat all the way back to provide maximum working space. Use your trim tool to gently pry off the side panel of the center console (it is held by clips).
Step 2: Remove the Under-Dash Cover
Locate the four clips holding the panel under the glovebox. Pop these clips and disconnect the wire for the footwell light and the speaker. Set the panel aside.
Step 3: Remove the Filter Cover
At the top left of the footwell, you will see a vertical plastic cover. Use your T20 Torx driver to remove the single screw at the top. Once removed, pull the cover off.
Step 4: Extract Old Filters
Pull the tab on the top filter to slide it out. The second filter will then slide up, allowing you to pull it out as well. Note the airflow direction arrows on the old filters before discarding them.
Step 5: (Pro Tip) Clean the Evaporator
While the filters are out, spray an HVAC foam cleaner (like Kool-It) into the housing towards the silver cooling coils. Let it sit for 15 minutes to kill mold and bacteria.
Step 6: Install New Filters
-
Insert the first filter and slide it down to the bottom.
-
Insert the second filter on top of the first.
-
Crucial: Ensure the arrows on the filters are pointing toward the rear of the car.
Step 7: Reassemble
Replace the T20 screw, the footwell panel, and the side console trim.
Final Thoughts for Tesla Owners
Replacing your Tesla Model 3 air filters is a simple “Level 1” DIY task that significantly improves your driving experience. By following this guide, you ensure your Tesla remains the clean, high-tech sanctuary it was designed to be.
Frequently Asked Questions (FAQ)
1. How much does Tesla charge for air filter replacement?
A Tesla Service Center typically charges between $70 and $100 for parts and labor. Doing it yourself costs roughly $25–$40 for the filters.
2. Why does my Tesla smell like dirty socks?
This is caused by condensation on the AC evaporator which leads to mold growth. Replacing the filters and using a foam cleaner usually fixes the “dirty sock” syndrome.
3. Which air filters are best for the Model 3?
While OEM Tesla filters are good, many owners prefer aftermarket HEPA filters with activated carbon for better filtration of road exhaust and allergens.


Leave a Reply